If you're considering a trip to Singapore, you should know the requirements for entering the country. One of these key requirements is the SG Arrival Card.
In this article, I'll guide you through the process of completing this card and its significance. Stay tuned!
The SG Arrival Card is an electronic version of the earlier paper-based disembarkation/embarkation card, often referred to as the white card.
Previously, every foreign traveler needed to submit this white card upon their arrival in Singapore for immigration clearance.
However, as of March 27, 2020, the Immigration Checkpoints Authority (ICA) ceased the use of these paper cards. Instead, all visitors must now submit their details electronically through the SG Arrival Card system.
This digital arrival card collects details about the visitor's identity, the reason for their visit, and other travel specifics. The primary goal is to help the Singaporean government oversee the movement of individuals entering the country.
Moreover, the SG Arrival Card is usually combined with an Electronic Health Declaration. As a result, all visitors are required to answer health-related questions, such as whether they've experienced symptoms like fever or cough in the past 14 days or if they've been in close contact with someone displaying these symptoms.
Here's a simple tutorial on how to fill out the SG Arrival Card, along with the Electronic Health Declaration, using either your phone or a tablet/laptop.
In addition, I also used the ICA (Immigration Checkpoints Authority) official website. If you're planning to use its apps downloaded from Play Store or App Store, that would be okay too. The tutorial is pretty much the same.
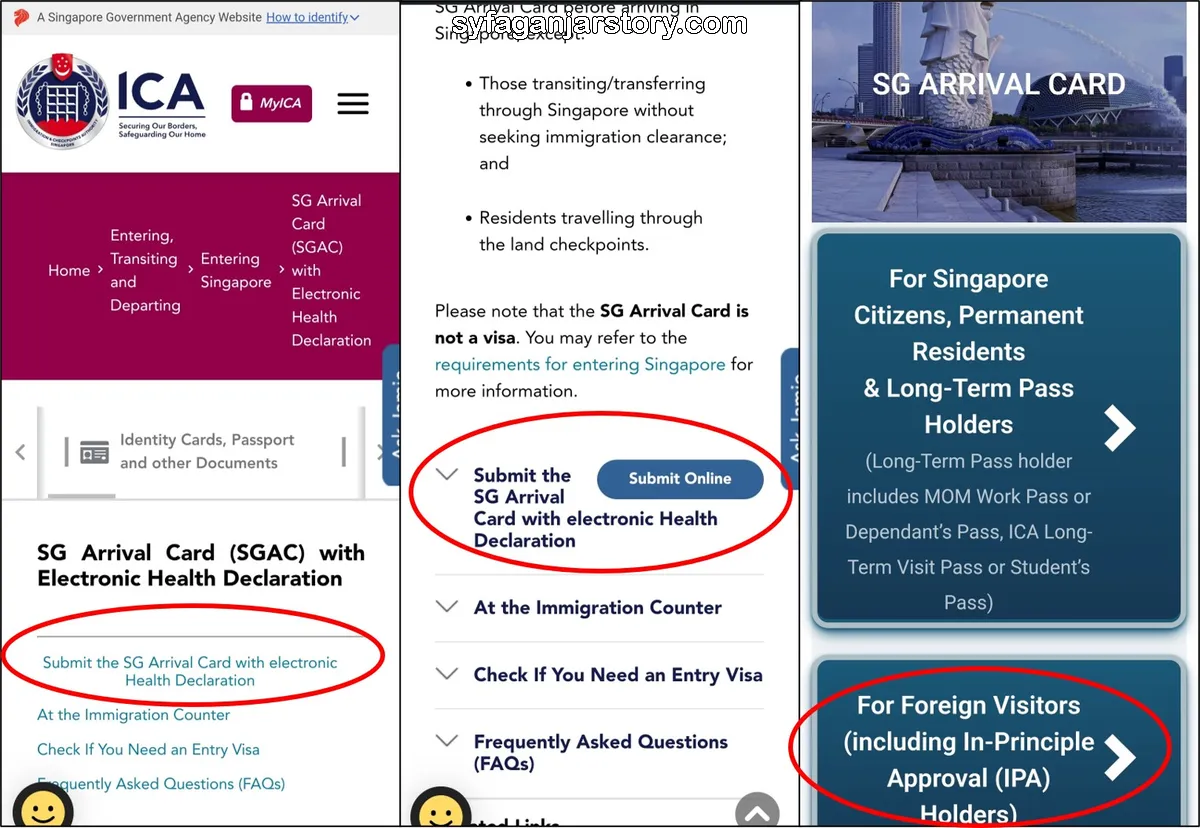
Start by visiting the official Immigration Checkpoints Authority (ICA) website. Once on the site, click on the option "Submit the SG Arrival Card with Electronic Health Declaration" (that is red-highlighted for easy identification).
You'll then be directed to a new page like in picture two. Then, click "Submit Online." After that, we'll be exposed to two different options; For Foreign Visitors and For Singapore Citizens. Since this guide is made primarily for tourists, select the "Foreign Visitors" option (unless you're a Singaporean citizen).
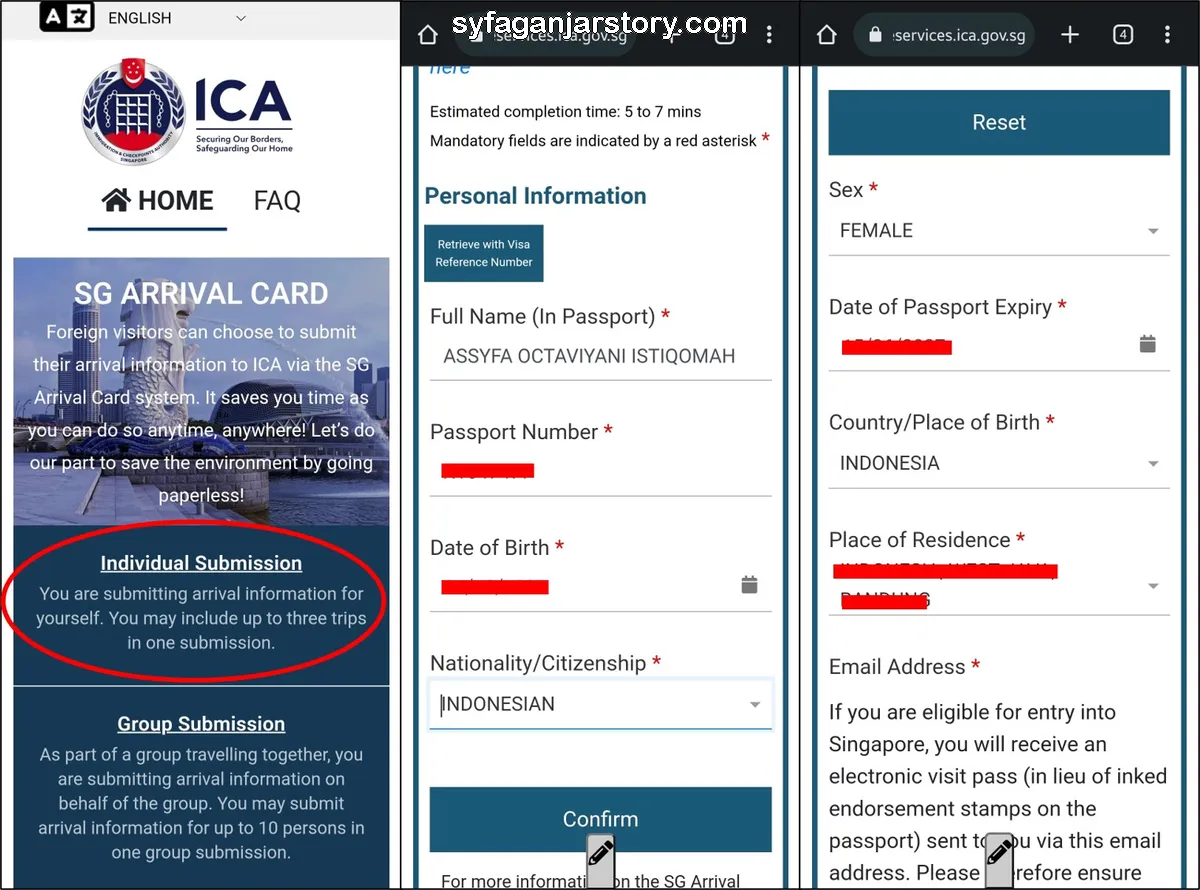
You'll see several choices: Individual Submission, Group Submission, Update a Submission, and e-Pass Enquiry Portal. If you're traveling alone, click 'Individual Submission.'
For groups traveling together, select 'Group Submission.' This option allows a single individual to input the details for up to ten people at once. In this case, you can choose these options based on your travelling needs. Since I only traveled with my husband, so we chose the Individual Submission for our travel details.
After that, Enter your personal details, including your full name, date of birth, passport number, nationality, gender, passport expiration date, residence, email address, and mobile number. Ensure all the details are accurate to avoid issues at the immigration checkpoint.
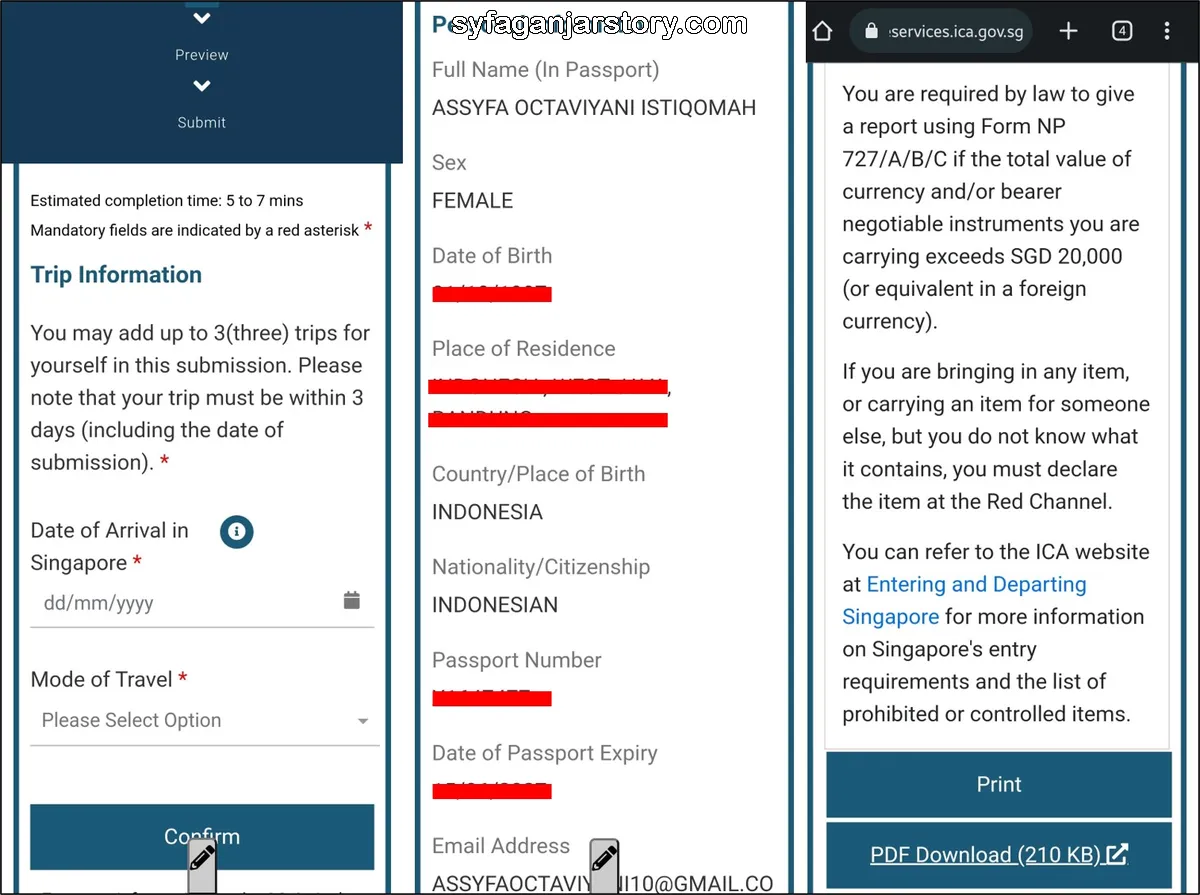
Filling in the date of arrival is a key step, and it comes as a package with the return date from Singapore. Make sure to enter the exact dates for both your arrival and departure, as this ensures that there is no confusion at immigration.
Next, you'll need to detail the type of transportation mode used to go to Singapore. In my own experience, since my husband and I used an airplane, we had to prepare information about our airline and flight number.
For example, we flew with Singapore Airlines, so we put down SQ 951 as the flight number. If you are flying to Singapore, you can find this information on your boarding pass.
All the questions listed in this system are very easy to answer, as they are often in a multiple-choice format. Therefore, you don't need to type them out yourself. Just be careful when selecting your answers to make sure everything is correct.

Next, you'll need to specify where you'll be staying during your visit to Singapore. If you've booked a hotel, simply enter its name. On the other hand, if you're staying with friends or family, be sure to provide their complete address.
From my personal experience, entering the hotel's name was simple. Once you start typing, the system might recognize the hotel's name and display it for you. You can then select the name without having to type the entire address.
Additionally, the system will ask you about your last city or port of embarkation before arriving in Singapore, as well as the next city or port you'll be traveling to after leaving Singapore. Ensure you fill in this section based on your travel itinerary.
The next step is to select the main reason for your trip to Singapore. The system provides various options, such as business, tourism, or visiting family. It's essential to pick the choice that aligns most accurately with your travel intent.
Once you've entered your personal details, travel information, and answered some health-related questions—such as if you've had any fever symptoms in the past 14 days or have been in contact with suspected COVID cases—you'll have a chance to review everything.
These health inquiries are straightforward; you simply click "yes" or "no" based on your situation. It's crucial to go over this preview carefully. If you spot any mistakes, you can correct them. If everything looks accurate, proceed by clicking the 'Confirm' button.
Lastly, it's recommended to save all this information in a PDF format. This will help streamline the process during immigration checks. There will be an option to "Save PDF."
After doing so, I also like to take a screenshot on my phone as a backup, ensuring I have easy access to the document when needed.
To fill out the SG Arrival Card, besides the official Immigration Checkpoints Authority (ICA) website, you can utilize the MyICA mobile app, available for download on the Play Store or App Store. Here’s how you can do it:
Begin by launching the MyICA Mobile app. If you haven't installed it yet, download it from the Google Play Store or the App Store.
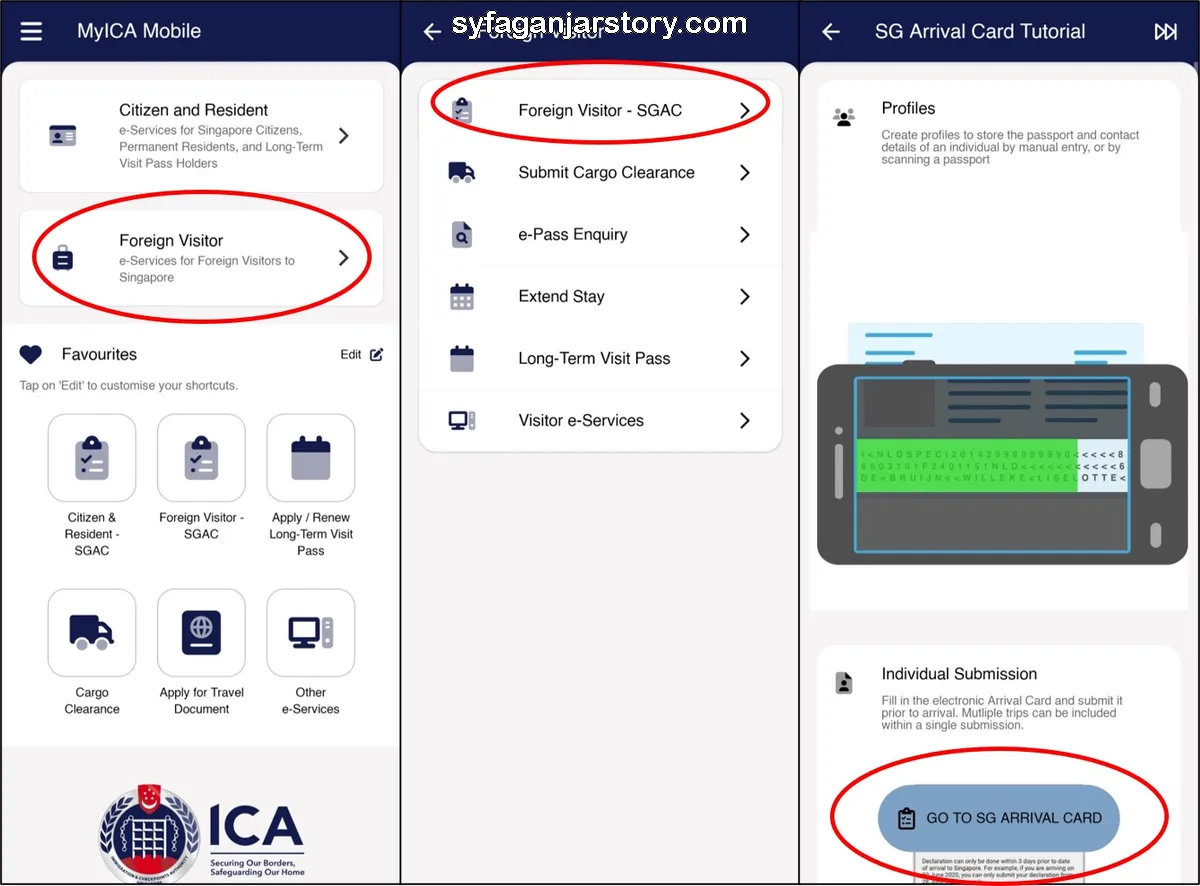
Once you open the app, select the options for "Foreign Visitor-SGAC" and "Go to SG Arrival Card" to enter your information. You’ll see "Individual Submission" and "Group Submission" choices.
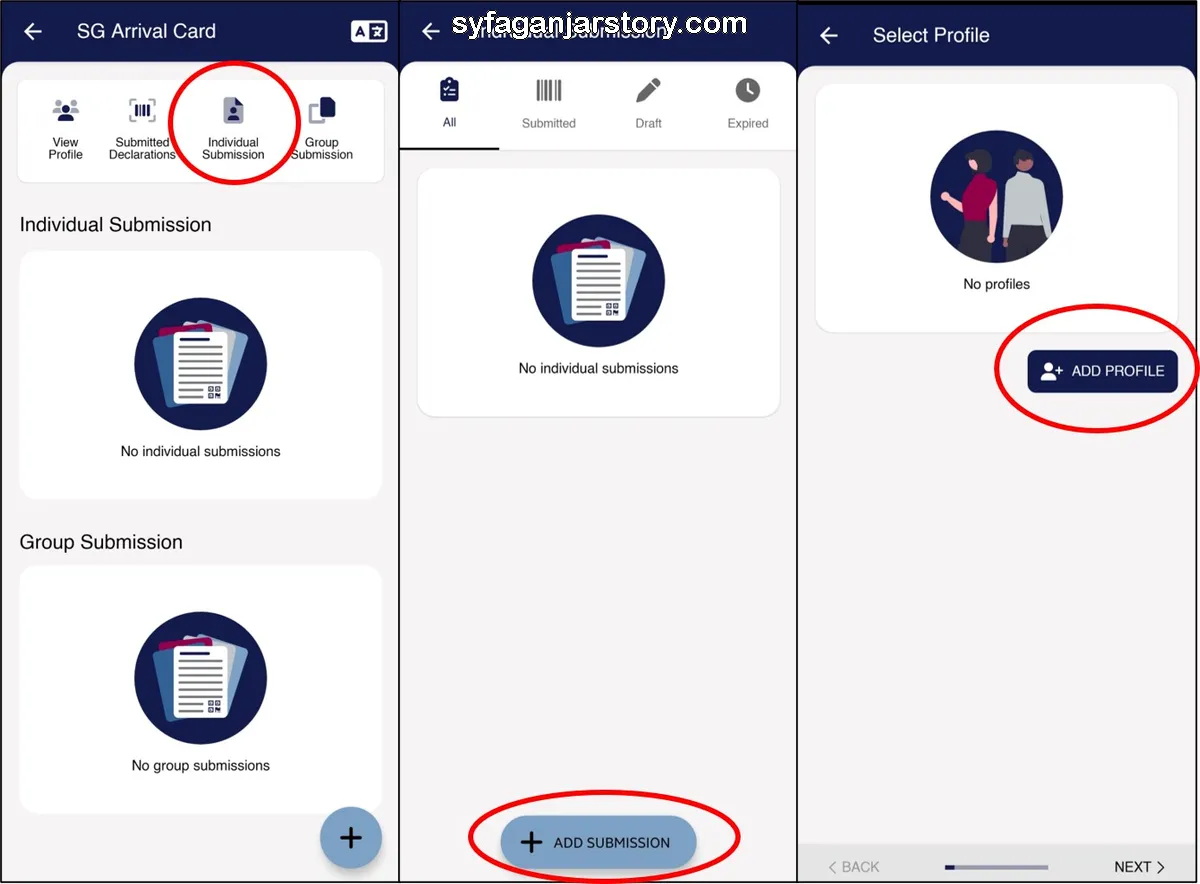
For individual travelers, opt for the Individual Submission. For those in group, such as family or friends, one person can fill out the SG Arrival Card for the entire group using the Group Submission, which allows up to 10 people in one go. The information for all group members will mirror the first person’s details, so ensure accuracy.
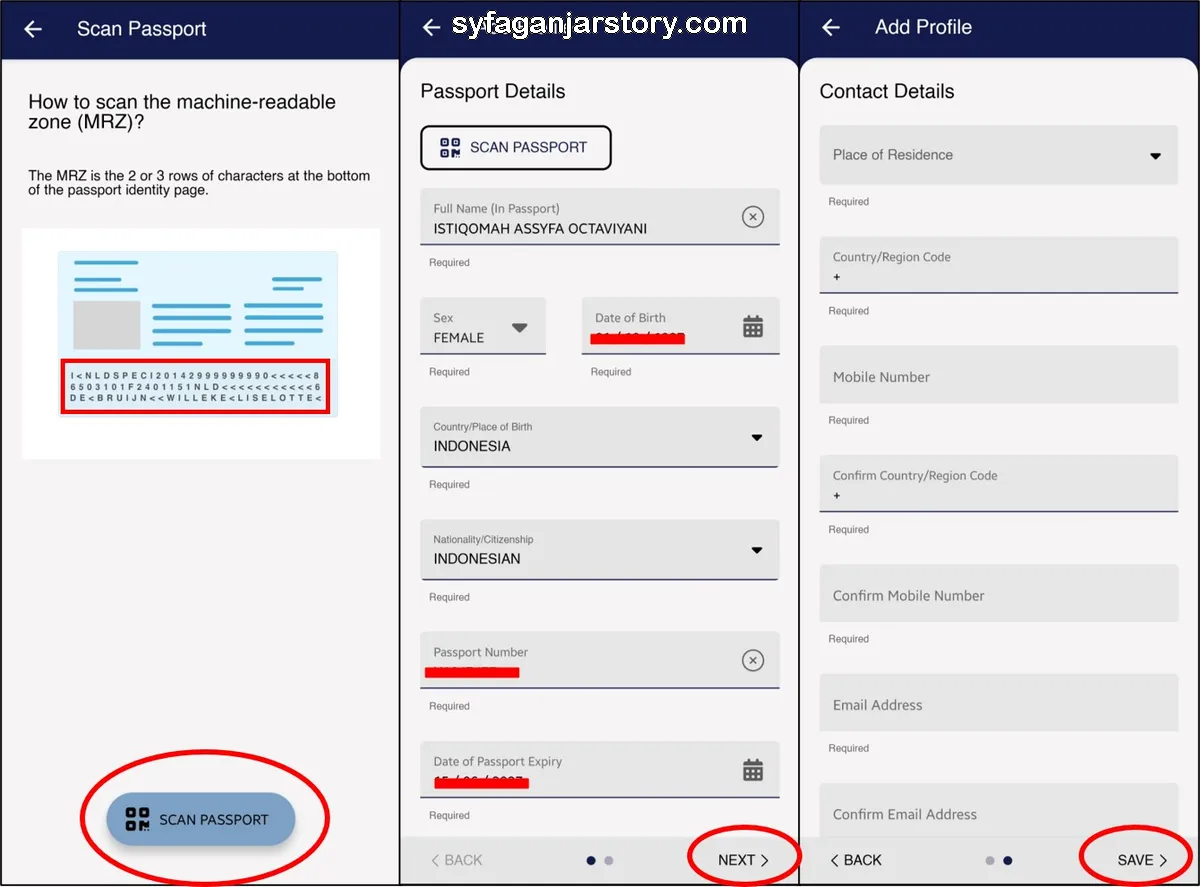
Select "Add Profile" to input your personal information. Use the "Scan Passport" feature to scan the machine-readable zone at your passport's bottom, which captures your name, gender, date of birth, nationality, passport number, and expiry date.
You must also provide your contact details, including residence, country code, mobile number, and email address. Confirm by clicking "Save".
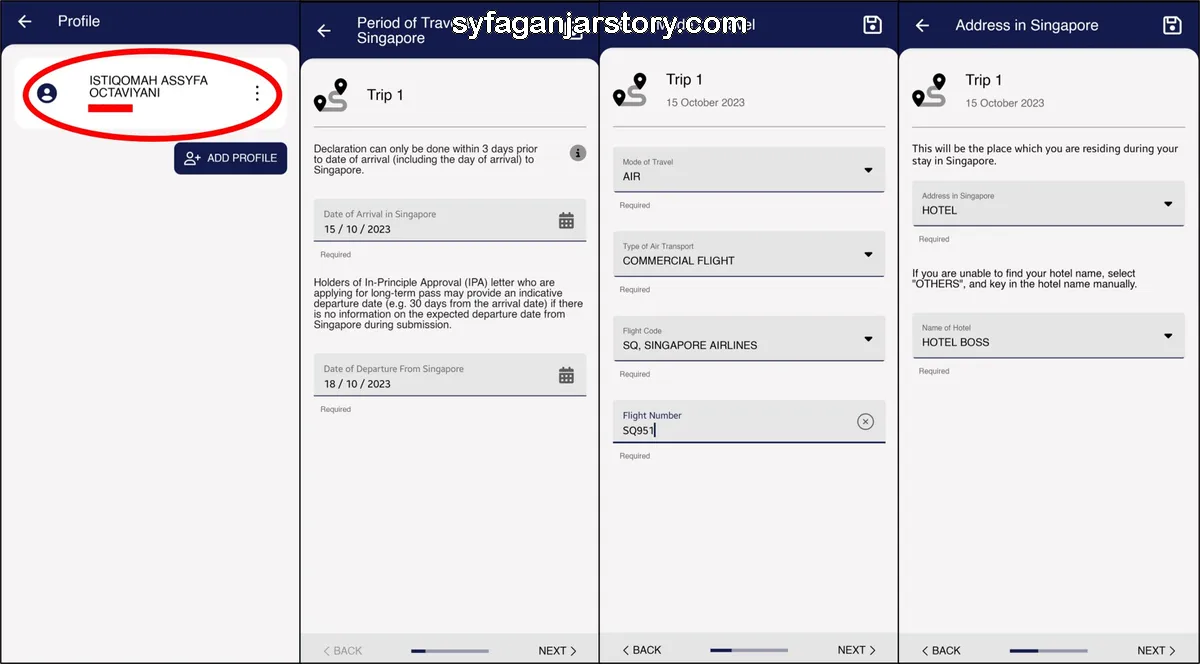
With your profile set up, proceed to enter your travel information. Next, detail your arrival and departure dates, transportation means, and Singapore accommodation.
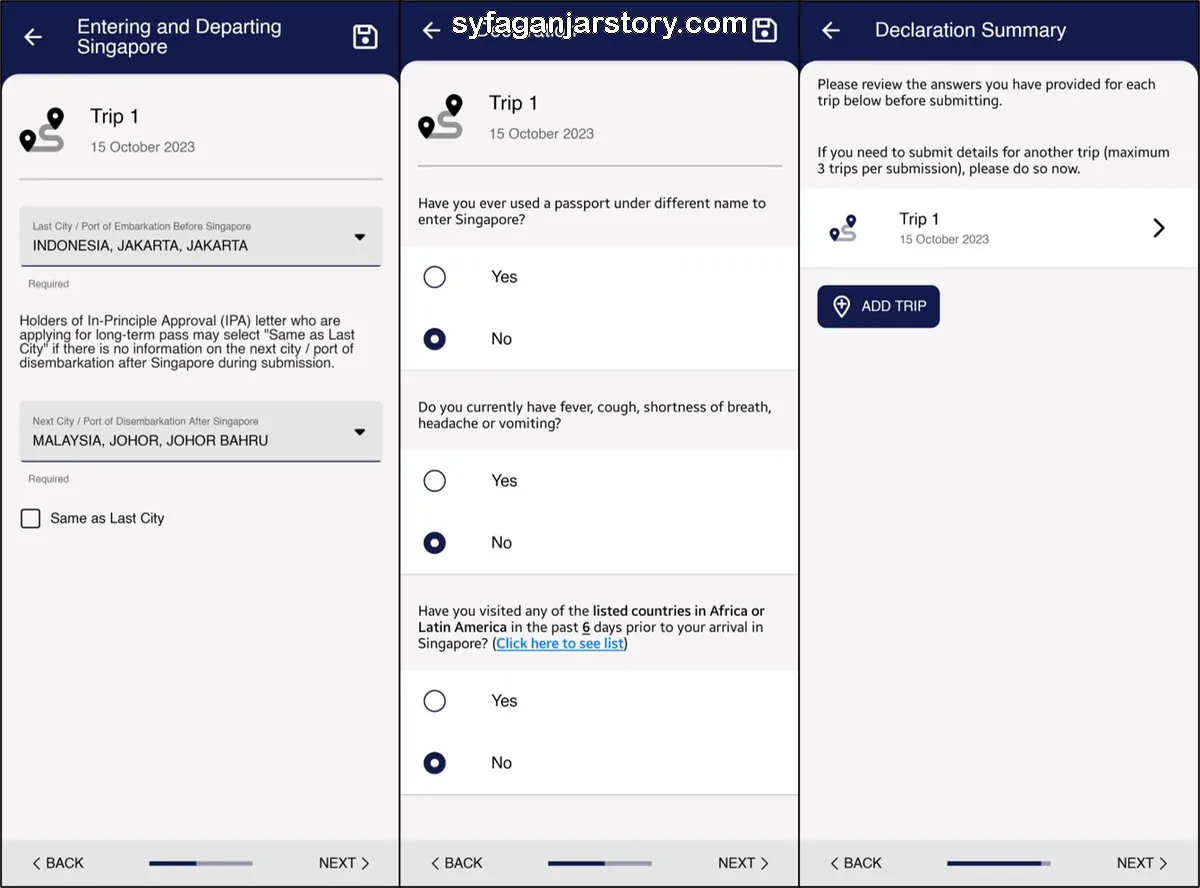
Then, specify the cities you'll be traveling from and to. For instance, I listed Jakarta as my departure city and Johor Bahru as my next destination.
After that, respond to health-related inquiries and disclose if you've visited certain countries within six days prior to arriving in Singapore. Lastly, review your entered data in the Declaration Summary.
If you think there's some mistake in the submission, simply click "Back" and you will be able to correct it. However, If all is correct, move forward by clicking "Next".
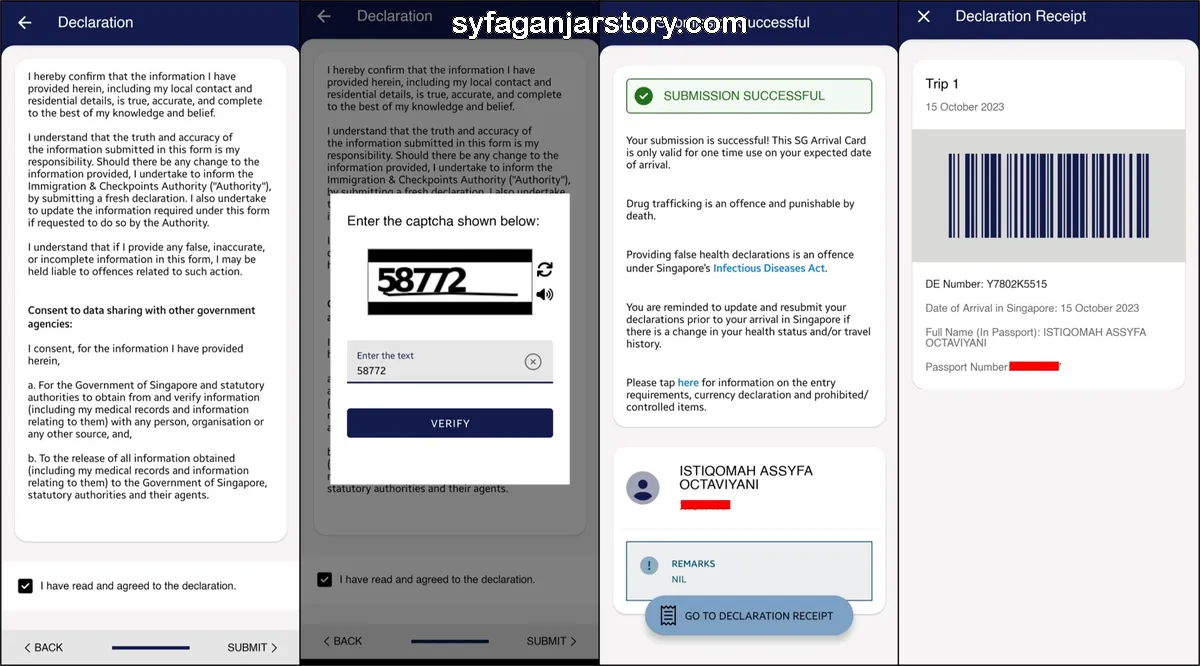
Read through the 'Declaration' section and agree to the terms. Input the Captcha code for verification and click "Verify". Upon completion, click "Go to Declaration Receipt" to view the barcode summarizing your submitted data.
I would recommend you to take a screenshot of this receipt, especially in situations where your phone might lack signal. With that, the process is complete!
Next, I will also address the frequently asked questions about the SG Arrival Card. I'll try to cover them one by one. If you have any other questions, please write them down in the comment section.
Do I need to fill out the SG Arrival Card if I'm visiting Singapore for a vacation?
All travelers are required to complete the SG Arrival Card before arriving in Singapore. However, this rule doesn't apply to those who are just transiting or transferring through Singapore without applying for immigration clearance.
Similarly, Singapore citizens, permanent residents, and holders of Long-Term Passes*) entering Singapore via land checkpoints are exempt.
*Long-Term Passes include Student Pass, Dependant Pass, Long-Term Visit Pass, and Work Pass.
Can I submit the SG Arrival Card for multiple trips under a "Group Submission"?
No, you can't. "Group Submission" is meant for a group of individuals traveling together to Singapore on a single trip.
How early can I fill out the SG Arrival Card and the Electronic Health Declaration?
You can fill out the SG Arrival Card up to three (3) days before your arrival in Singapore. This is to avoid any unwanted delays during immigration checks.
For instance, if a traveler is arriving in Singapore on June 30th, they can only submit their electronic health declaration from June 28th onwards.
Who needs to submit an Electronic Health Declaration?
Every traveler coming to Singapore, including residents (Singapore citizens, permanent residents, long-term pass holders*), those registered under the Frequent Traveller Programme, and foreign tourists, are required to submit a health declaration as part of the SG Arrival Card process.
However, this doesn't apply to individuals who are just transiting or transferring through Singapore without needing immigration clearance or those entering via land checkpoints.
Unlike the SG Arrival Card, where Singapore citizens are exempt, the Electronic Health Declaration is mandatory for every traveler entering Singapore, including its citizens.